
This is the Nintendo Wii U, this is the second console I will be installing. The console is quite compact and can fit into almost any gaming setup, not to mention that it is incredibly quiet. And also known as Nintendo's first ever HD console!

This controller I am holding is known as the Wii U Gamepad, this is the main controller device for the Nintendo Wii U. It connects. The control have an Accelerometer a Gyroscope and a Geomagnetic sensor. These three devices power the motion control of the device. The control connects automatically.

This is the HDMI cable, branded by Nintendo, we will be using this to generate the visual output from the Wii U to the Television/Monitor

Firstly, plus the HDMI cable into the back on the TV in any available HDMI ports, in my case I only had one spare port, the console can also be connected using a RGB component cable, and/or any cable supported by the original Wii.

Next, plug the other end of the HDMI cable into the HDMI port on the back of the console, this is so that we can pass through a visual signal straight to the Television.

This here is the Wii sensor bar (Optional) we'll plug this in to allow use of the original Wii remote used by the Wii, the device is completely optional and the console and gamepad can function without it.

First, plug the sensor bars cable in the port on the back of the Wii U, this will power the cable so you can use the Wii Remote to point and click items with it.

Place the sensor bar above or bellow your TV, you can configure which area you are using it through the Wii U's settings so it works better with your position, make sure to place it in an open area so you're Wii Remote can see it.

This is the Wii U power supply, as you can see it comes with its own power pack, this is mainly why the Wii U is so small, because the power supply is external. It is a two ended cable, one end having a plug and the other end connects to the Wii U.

Plug one end of the cable into an open plug socket. This is so you can give the console power to run.

Plug the other end of the cable into the Wii U itself to give it power, you will immediately see the Wii U consoles power light turn on.

Press the power button on the Wii U to turn it on, you will know if this is successful when the LED above the Wii U power button turns blue, you will also hear the disc drive begin to run.

The Wii U Gamepad should also automatically turn itself on, the console will turn the Wii U Gamepad on by itself without any need to turn it on yourself.
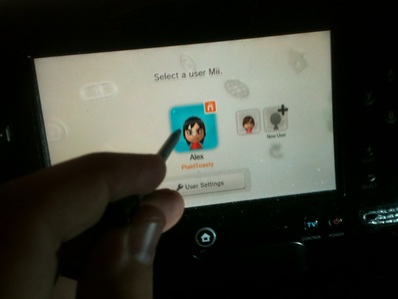
Make sure to choose the correct profile to start up your Wii U properly, you can also create a new profile If this is your first time ever starting a Wii U. Nintendo Network access is completely optional.
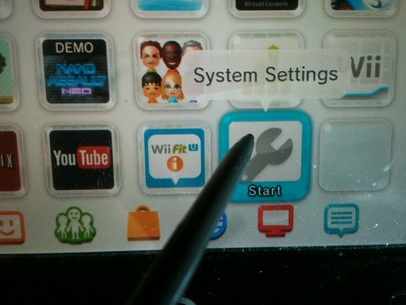
Click the system settings button the home screen UI to access the system settings, from there find your way over to the TV tab.

On this menu, you will see your current connection types and TV resolution, mine are already set, but if you're on a different TV, you can change these setting by clicking TV resolution.

Press the highest available quality, for me I chose 1080p as that is what is supported by the TV i was using.

If need be, you can also find your way onto the Data and Time tab to change the necessary details to make your console correct, as some games may require these features, like how Animal Crossing New Leaf uses the 3DS clock for special events during seasons.

Same goes for the above picture.

And as i previously stated, some software may use these settings for events and so on.

To play a game, you will need to insert the disc into the console manually. The disc drive is a slot loader and will pull in the disc automatically, after this you can start the game from the Home screen.

And there you have it! You can now play your Wii U to the fullest quality, have fun!
